Authenticate your web app using AWS Cognito
Implement AWS Cognito authentication using Authorization Code Grant with hosted UI into your Nextjs application

Backend developer with strong experience in the .NET ecosystem and AWS. Other development skills include JavaScript/React/Vue, HTML, CSS.
In this article, you will find out how to integrate AWS Cognito into NextJs and understand the different authentication types that Cognito supports.
I had a use case where I wanted to integrate Cognito into a web app. For reasons I will explain later, I needed to use the OAuth Authorization Code Grant. However, when reading the documentation, I found it difficult to understand how to integrate Cognito into the web app. Hence I decided to write this article.
Before you start, you will need an AWS account.
Who is this article for?
This article is for anyone who wants to integrate with Cognito for authentication, or is simply curious, but doesn't know where to start.
I have implemented this in NextJs because that's what I'm familiar with, however, there is no reason you can't implement the whole process in any other language or framework.
What is AWS Cognito?
Cognito is a managed AWS service that provides authentication, authorization and user management for your web and mobile apps.
Why would you want to use Cognito?
Essentially, Cognito will allow you to quickly implement authentication into your application without needing to spend time building it yourself. Cognito is great if you just want to focus on implementing user features in your application. Perhaps you are building a prototype application, and want to get the application running as quickly as possible to see if it is viable.
What is OAuth?
OAuth (Open Authentication) is an open standard for authentication that apps can use to provide client applications with 'secure delegated access'. The simplest example of this would be any website that lets you log in with Google or Github, rather than logging into the application directly.
I won't explain OAuth in too much detail because there are already many articles about this. I found this article titled 'What the Hack is OAuth?` pretty helpful.
Authorization code grant vs Implicit grant
Implicit grant
The implicit grant is the easiest to implement. Using the implicit grant will return the access token directly to the client (browser or mobile app), which is recommended for a single-page application without any backend.
The main downside to implicit grant is security. As I mentioned above, the access token is returned to the client, usually through a URL parameter. This means there is a risk that the access token could be taken via an XSS attack or even just server logs.
Authorization code grant
The authorization code grant is similar to the implicit grant, however, it adds a few additional steps. Instead of the authorization code being returned directly to the browser, a code is returned. The code can then be sent to the client backend and using the client_id and client_secret can be exchanged for the access token.
The benefit to this approach is although the code could be intercepted, only the client backend can use it to get the access token because the client_secret is required.
What is the hosted UI?
The hosted UI provided by Cognito is as it sounds, an out-of-the-box user interface with allows a user to do any authentication-related tasks, such as logging in, creating an account etc.
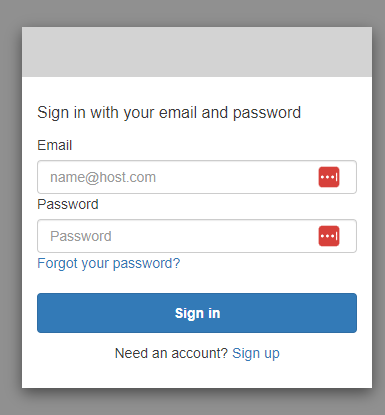
The hosted UI is the fasted way to get started with authentication for your application. Additionally, you can customise Cognito UI to some extent.
Alternatively, you could build the login/register forms directly into the application. But obviously, that's going to take some time. You can find out more by reading the Cognito documentation.
Setting up Cognito
Before you start, you will need an AWS account to follow this guide. Check out this article by amazon on how to register an AWS account.
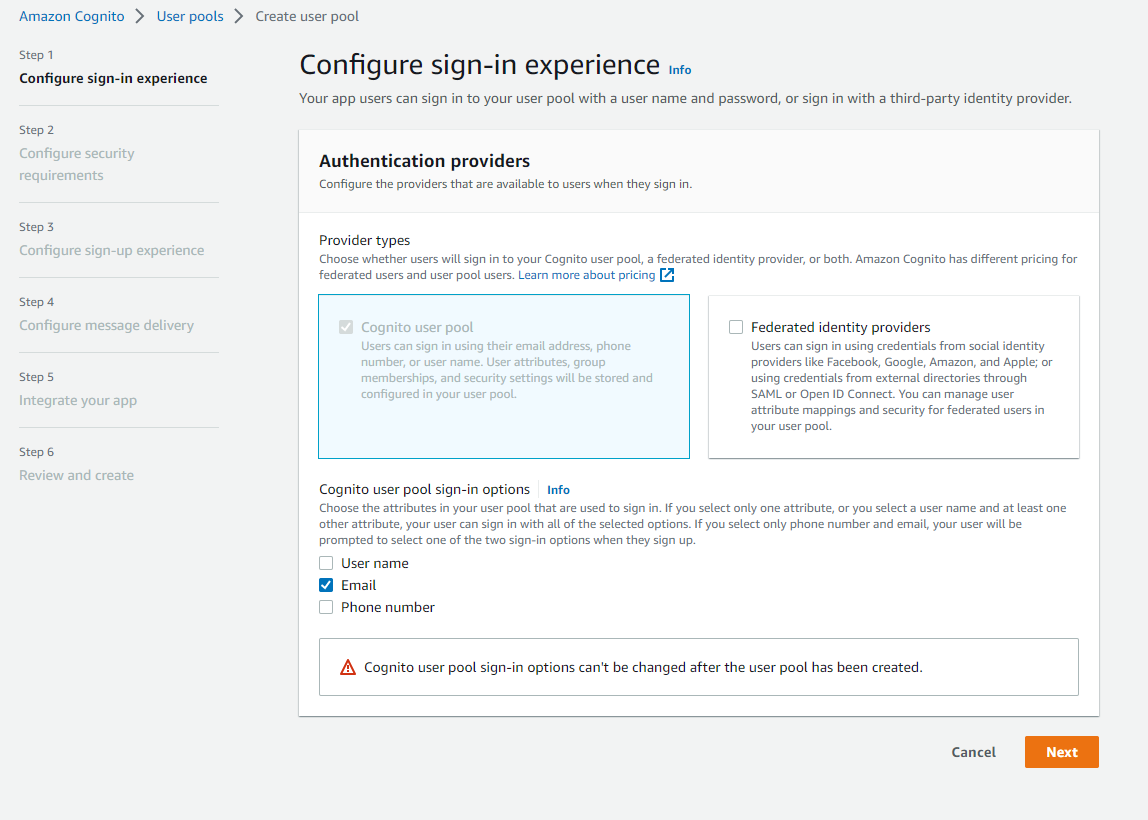
First, create a new user pool and select your sign-in options. You can select any combination of username, email or password. I have selected email because I only want users to log in with their email.
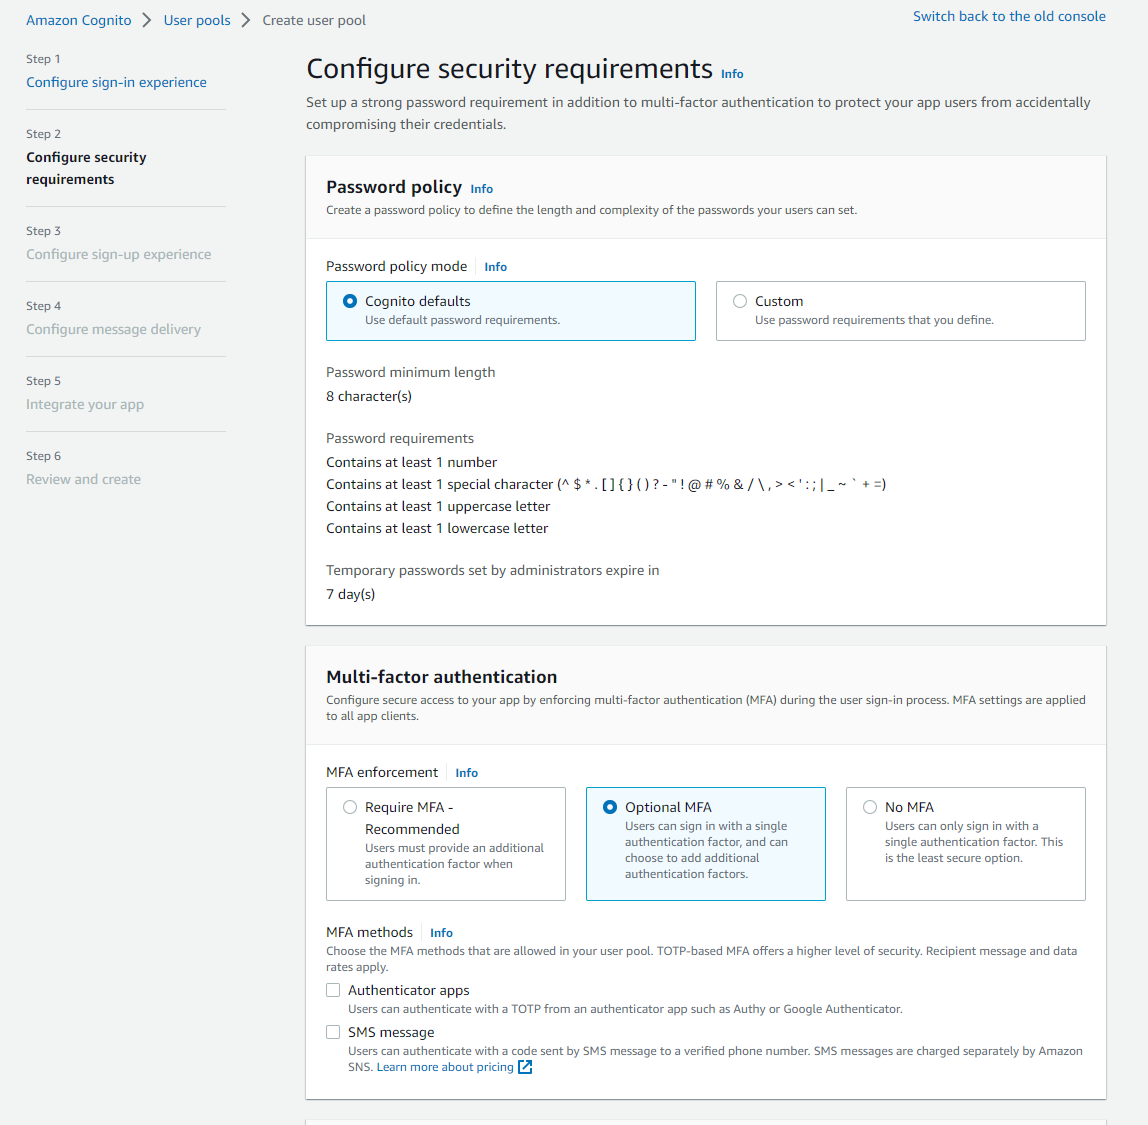
For the security requirements page, I will keep everything as default, except for multi-factor authentication. For this article, I have set MFA as optional. This makes it easier to sign up new users without implementing MFA. However, I would recommend making MFA mandatory for production applications.
You will need to select at least one of the MFA methods. I have chosen only Authenticator apps.
I will not change any of the settings in the Configure sign-up experience page
For message delivery, I suggest selecting 'Send email with Cognito' as this is the easiest.

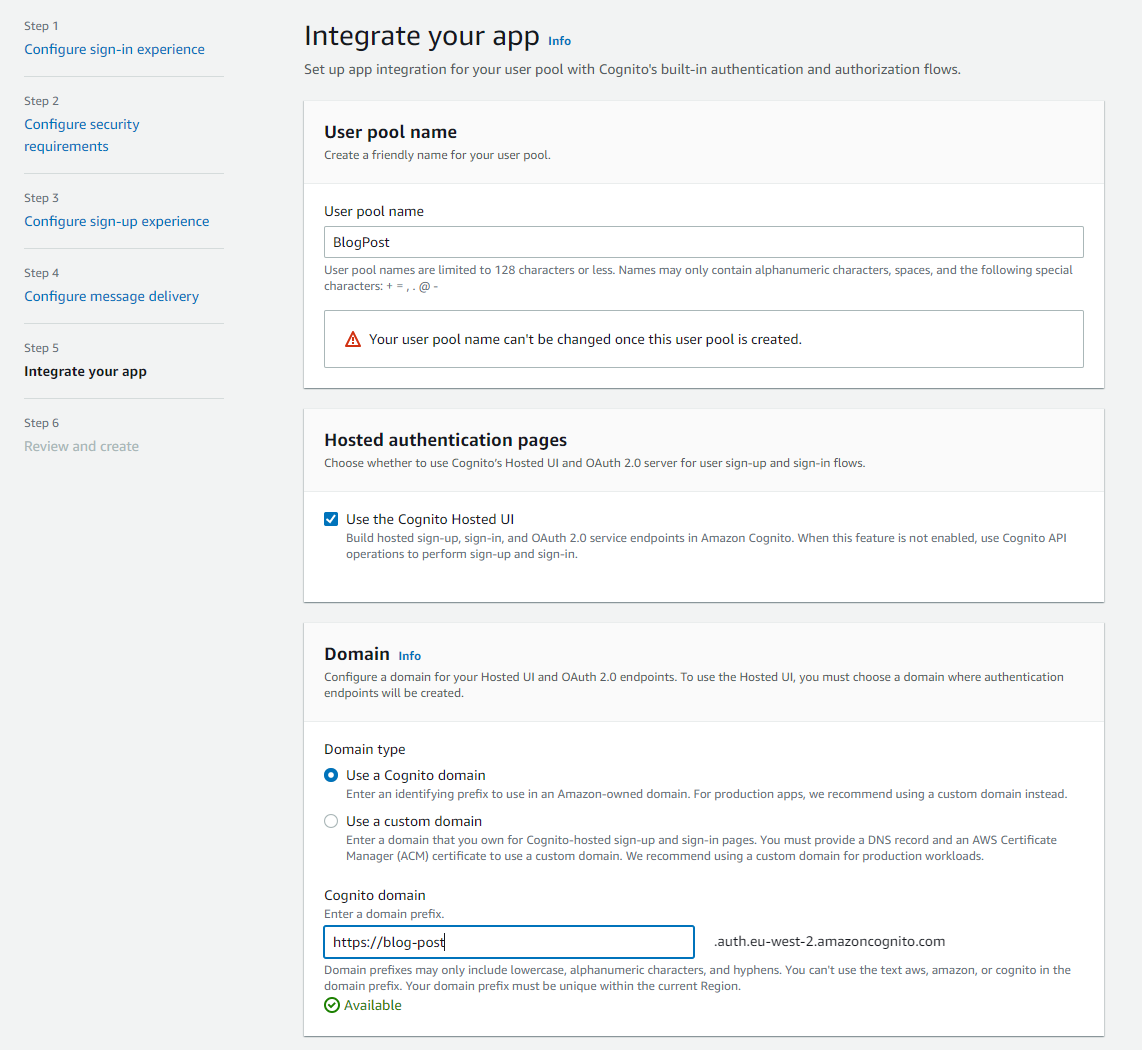
You must also come up with a pool name. The name doesn't matter too much, just try and keep it consistent.
Select 'Use the Cognito Hosted UI', and enter a similar Cognito domain name. I have used 'BlogPost' and 'blog-post'.
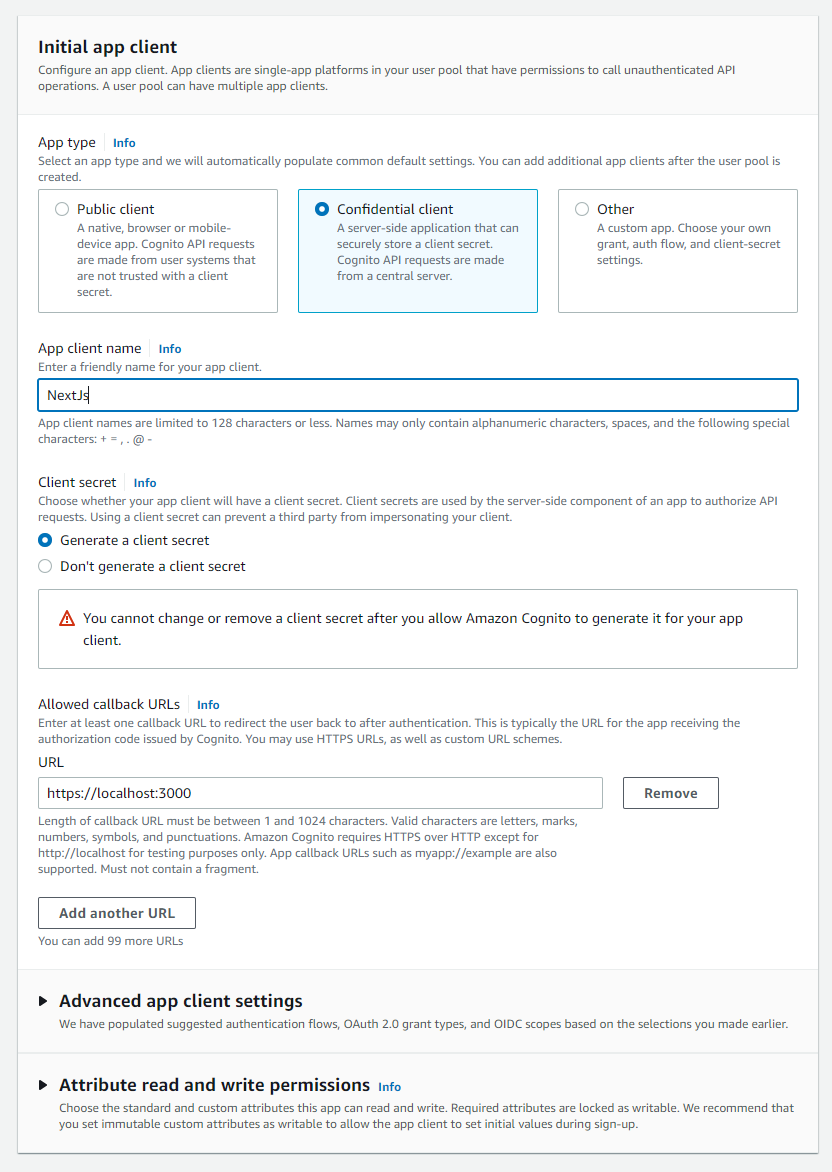
In the Initial app client section, select 'Confidential client' as the app type. This is essentially the Authorization code grant flow.
The name of the app client doesn't matter too much, so I have called mine NextJs because that is the app that will use it. Then add http://localhost:3000 and http://localhost:3000/api/auth to the allowed callback URLs. This is important so that the Hosted UI can redirect back to the local project.
You will also need to generate a client secret. This is required for the Authorization Code grant flow, but it should be enabled already since you selected 'Confidential client' as the app type.
Finally, check all of the options in the review step and click create.
Setting up NextJs
Scaffold the NextJS app
npx create-next-app@latest
# or
yarn create next-app
Install Dependencies
npm install aws-jwt-verify cookies-next
#  or
yarn add aws-jwt-verify cookies-next
Cleanup the homepage
Replace the homepage with the following.
./pages/index.js
export default function Home() {
  return (
    <div>
      <h1>Protected Homepage</h1>

      <div>
        <button>Logout</button>
      </div>
    </div>
  );
}
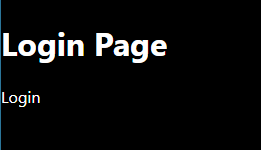
Add the login page
Create the file ./pages/login.js
export default function Login() {
  return (
    <div>
      <h1>Login Page</h1>

      <p>
        <a href="">Login</a>
      </p>
    </div>
  );
}
Add and populate the environment file
Create the file .env.local:
CLIENT_SECRET=

NEXT_PUBLIC_CLIENT_ID=
NEXT_PUBLIC_USER_POOL_ID=
NEXT_PUBLIC_REGION=
NEXT_PUBLIC_DOMAIN=http://localhost:3000
NEXT_PUBLIC_COGNITO_URI=
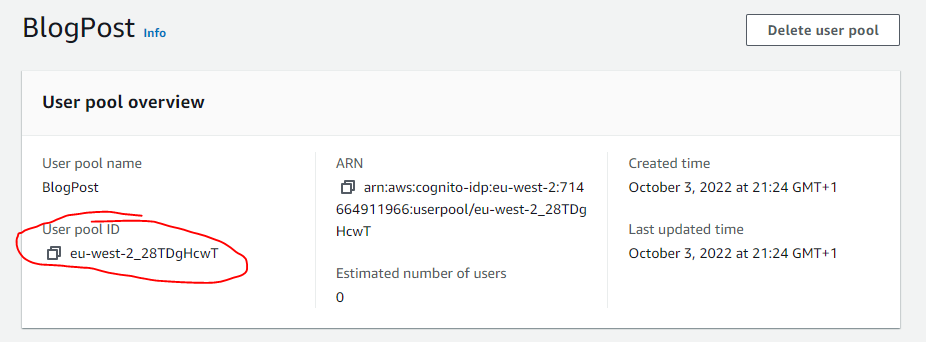
The region will be whatever region you have already selected in the AWS console.
The User pool Id can be found in the overview section.
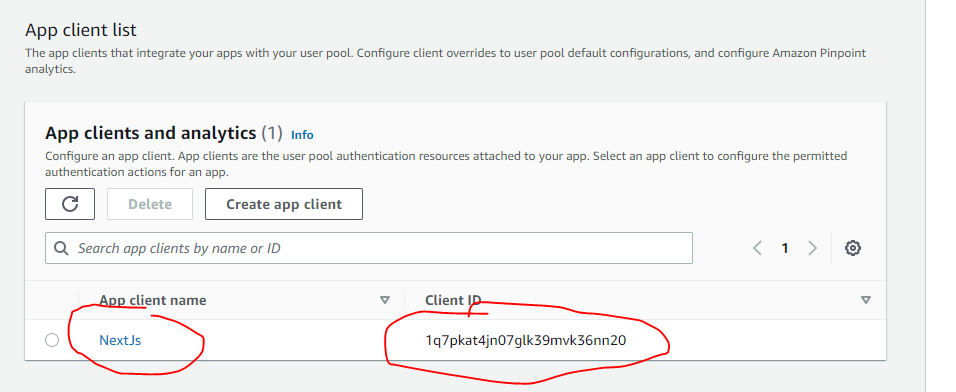
Next, open the 'App integration' tab, and scroll to the bottom of the page.

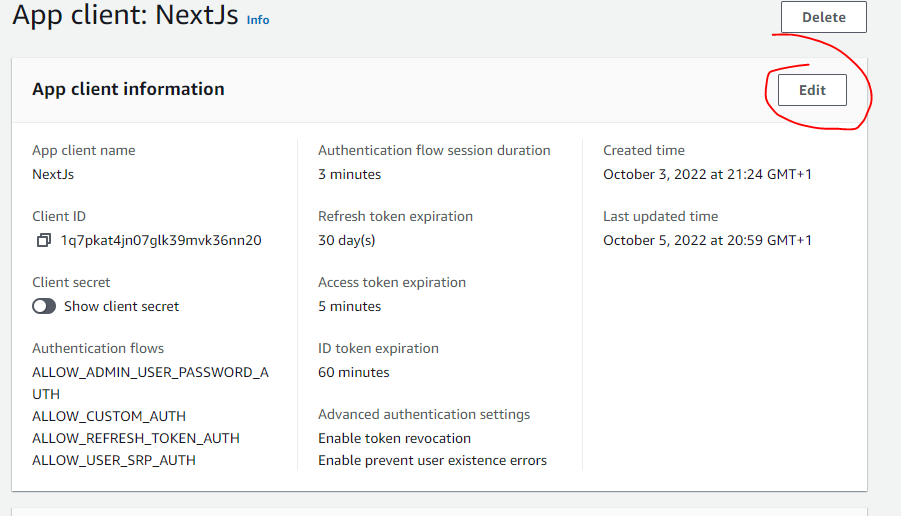
You can grab your clientId here. Navigate to your app client.
You can view the client secret after clicking 'show client secret'
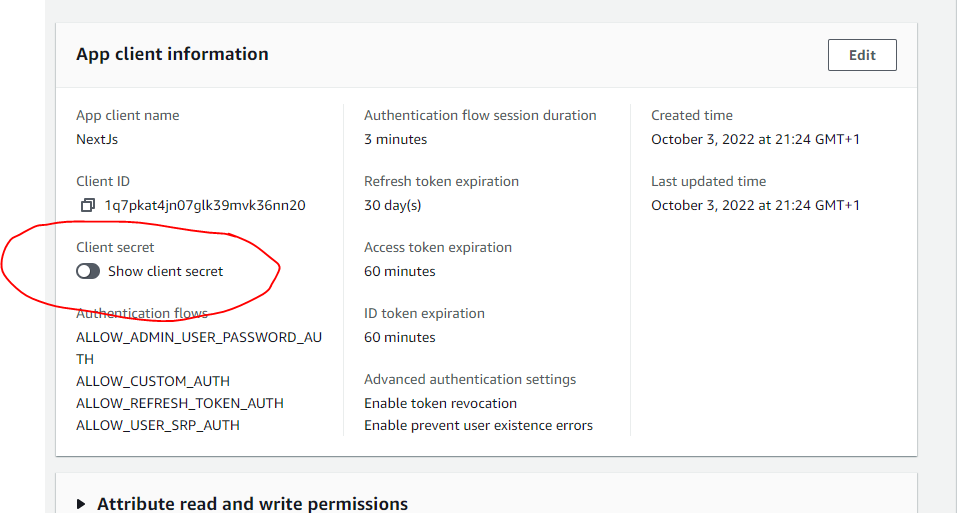
If you then scroll down, you can view the hosted UI.
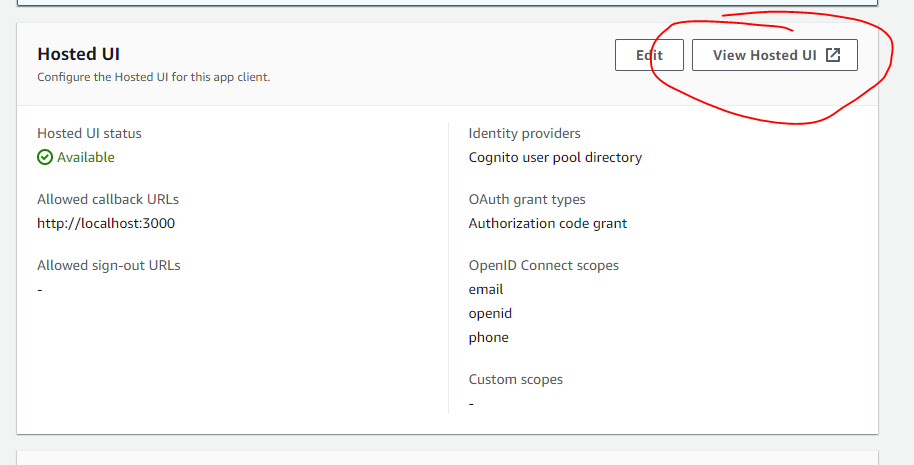
Copy the domain of the URL, this is the COGNITO_URL variable. For example, mine is https://blog-post.auth.eu-west-2.amazoncognito.com/.
Adding login functionality
Now that everything is set up, we can get started integrating with the login page.
Add the following line to the login page component.
const loginUrl = `${process.env.NEXT_PUBLIC_COGNITO_URI}/login?client_id=${process.env.NEXT_PUBLIC_CLIENT_ID}&response_type=code&scope=email+openid+phone&redirect_uri=${process.env.NEXT_PUBLIC_DOMAIN}`;
and update the link to navigate to that link.
<a href={loginUrl}>Login</a>
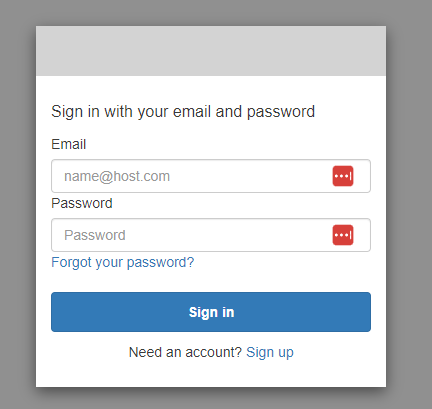
If you navigate to the link, you will be presented with the Cognito hosted UI. Once you successfully log in, you will be redirected back to the provided redirect_uri.
Testing the login page
Now, run the following command to start nextJs:
npm run dev
# or
yarn dev
Once the terminal is running, visit http://localhost:3000/login in your browser. You should see a login page with a button.
Next, click on the Login button. You will be redirected to the URL of the Hosted UI. You will need to sign up.
Once you have signed up, you should have been redirected to the homepage, since the redirectUrl was http://localhost:3000. Notice that in the URL, there is now a code parameter. We will need to use this code to get the access token.

Fetching the token
Before we start, update the file pages/login.js and replace the login URL with the following:
const loginUrl = `${process.env.NEXT_PUBLIC_COGNITO_URI}/login?client_id=${process.env.NEXT_PUBLIC_CLIENT_ID}&response_type=code&scope=email+openid+phone&redirect_uri=${process.env.NEXT_PUBLIC_DOMAIN}/api/auth`;
Instead of the hosted UI redirecting back to the homepage, we can redirect to an API route /api/auth, and then use the code to get the access token.
Create the file pages/api/auth.js with the following code.
import { setCookie as nextSetCookie } from "cookies-next";

const COOKIE_NAME = "ACCESS_TOKEN";
const REDIRECT_URL = process.env.NEXT_PUBLIC_DOMAIN;

export default function handler(req, res) {
  if (req.method !== "GET") return;

  const { code } = req.query;

  return new Promise((resolve) => {
    verifyToken(code)
      .then((body) => {
        const { access_token } = JSON.parse(body);

        nextSetCookie(COOKIE_NAME, access_token, {
          req,
          res,
          path: "/",
          sameSite: "lax",
          httpOnly: true,
        });

        res.writeHead(302, {
          Location: REDIRECT_URL,
        });

        res.end();
        resolve();
      })
      .catch((error) => {
        res.status(500).end();
        resolve();
      });
  });
}

const verifyToken = (code) => {
  const clientId = process.env.NEXT_PUBLIC_CLIENT_ID;
  const clientSecret = process.env.CLIENT_SECRET;
  const authEndpoint = `${process.env.NEXT_PUBLIC_DOMAIN}/api/auth`;

  var myHeaders = new Headers();
  myHeaders.append("Content-Type", "application/x-www-form-urlencoded");

  var urlencoded = new URLSearchParams();
  urlencoded.append("grant_type", "authorization_code");
  urlencoded.append("code", code);
  urlencoded.append("client_id", clientId);
  urlencoded.append("redirect_uri", authEndpoint);
  urlencoded.append("client_secret", clientSecret);

  var requestOptions = {
    method: "POST",
    headers: myHeaders,
    body: urlencoded,
    redirect: "follow",
  };

  return new Promise((resolve) => {
    fetch(`${process.env.NEXT_PUBLIC_COGNITO_URI}/token`, requestOptions)
      .then((response) => response.text())
      .then((response) => {
        resolve(response);
      })
      .catch((error) => {
        reject(error);
      });
  });
};
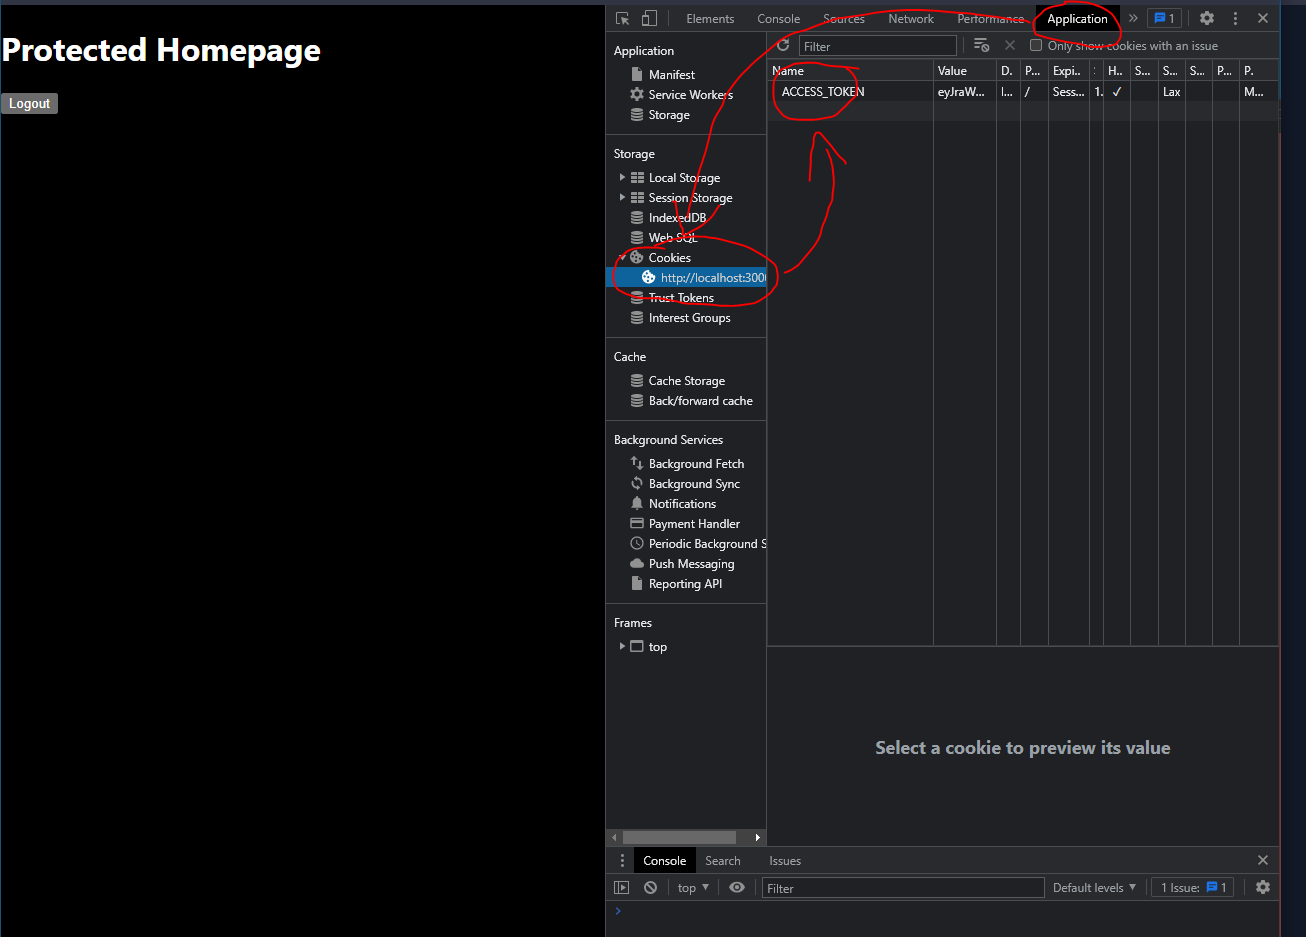
Essentially, this endpoint is getting the code, and sending a request to the Cognito token endpoint. The Cognito endpoint then returns an access token, we can then set it as an HTTP cookie.
You can now view the token by navigating to Chrome Dev tools, Application, Cookies, http://localhost:3000 then ACCESS_TOKEN.
Here is a link to read more about the Cognito token endpoint.
Cleanup
You can also delete pages/api/hello.js.
Adding protected routes
Now that we have the login mechanism working, we need some way to check if the user is authenticated.
The authentication will need to be server-side. So add the following to the pages/_app.js file.
import "../styles/globals.css";

import Router from "next/router";
import { CognitoJwtVerifier } from "aws-jwt-verify";
import { getCookie as nextGetCookie } from "cookies-next";

const COOKIE_NAME = "ACCESS_TOKEN";

function MyApp({ Component, pageProps }) {
  return <Component {...pageProps} />;
}

MyApp.getInitialProps = async ({ ctx, router }) => {
  if (!!ctx.req) {
    // Server side check
    if (router.pathname === "/login") return {};
  } else {
    // Client side check
    if (ctx.pathname === "/login") return {};
  }

  if (!(await isAuthorised(ctx))) {
    redirect(ctx.req, ctx.res, "/login");
    return {};
  }

  return {};
};

const isAuthorised = async ({ req, res }) => {
  const token = nextGetCookie(COOKIE_NAME, { req, res });

  if (!token) {
    return null;
  }

  const verifier = createVerifier();
  const payload = await tryParseToken(token, verifier);

  return payload;
};

const tryParseToken = async (token, verifier) => {
  try {
    const payload = await verifier.verify(token);

    return payload;
  } catch {
    return null;
  }
};

const createVerifier = () => {
  return CognitoJwtVerifier.create({
    userPoolId: process.env.NEXT_PUBLIC_USER_POOL_ID,
    tokenUse: "access",
    clientId: process.env.NEXT_PUBLIC_CLIENT_ID,
  });
};

const redirect = (req, res, path) => {
  if (!req) {
    Router.push("/login");
    return {};
  }

  res.writeHead(302, {
    Location: path,
  });
  res.end();
};

export default MyApp;
In this file, were using the NextJs getInitialProps hook to check if the token is valid. I have used the library aws-jwt-verify to make this process easier. If the token is invalid, the user will be redirected to the login page.
Try this out locally. Check that you are redirected to the login page, log in and then delete the token to test if you are redirected to the login page again.
Using refresh tokens
Refresh tokens are returned when the user is first authenticated alongside the access token. When the access token expires, you can make a request to the Cognito refresh endpoint, pass the clientId and clientSecret, and get a new access token.
The idea behind refresh tokens is you give access tokens a much shorter lifespan, let's say 5 mins to an hour. However, you give the refresh tokens a much longer lifespan, such as 1 day to 30 days. Due to the way JWT tokens work, you can't really make them expire, or 'logout a user', without saving a copy of the logged-out token on the server.
Instead, you can revoke the refresh token to log out. The access token will still be valid, but hopefully not for long if you have set a short lifespan. But then when you try to refresh the token, you won't be able to.
Updating the token lifespan
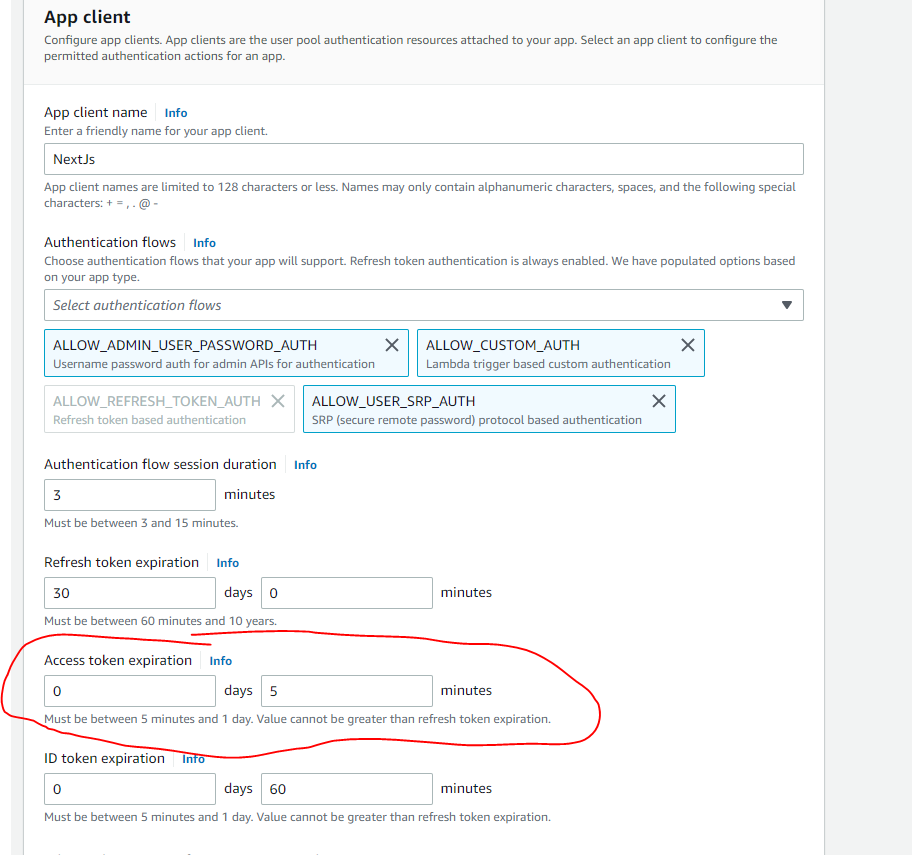
Navigate to the edit page of your app client in the AWS console.
Update the access token expiration to 5 minutes. I don't know what the optimal timespan for an access token is, but let's set it to the minimum for the purpose of the is the article. Doing so should make it easier to view the refresh token being used.
Updating the auth API route
First, we need to save the refresh token when authenticating. Navigate to the file pages/api/auth.js. Add the following line to the top:
const REFRESH_COOKIE_NAME = "REFRESH_TOKEN";
And update the verifyToken callback to create a new cookie:
verifyToken(code)
      .then((body) => {
        const { access_token, refresh_token } = JSON.parse(body);

        nextSetCookie(COOKIE_NAME, access_token, {
          req,
          res,
          path: "/",
          sameSite: "lax",
          httpOnly: true,
        });

        nextSetCookie(REFRESH_COOKIE_NAME, refresh_token, {
          req,
          res,
          path: "/",
          sameSite: "lax",
          httpOnly: true,
        });

        ...
      })
Next, navigate to the file pages/_app.js, and replace it with the following:
import "../styles/globals.css";

import Router from "next/router";
import { CognitoJwtVerifier } from "aws-jwt-verify";
import {
  getCookie as nextGetCookie,
  setCookie as nextSetCookie,
} from "cookies-next";

const COOKIE_NAME = "ACCESS_TOKEN";
const REFRESH_COOKIE_NAME = "REFRESH_TOKEN";

function MyApp({ Component, pageProps }) {
  return <Component {...pageProps} />;
}

MyApp.getInitialProps = async ({ ctx, router }) => {
  if (!!ctx.req) {
    // Server side check
    if (router.pathname === "/login") return {};
  } else {
    // Client side check
    if (ctx.pathname === "/login") return {};
  }

  if (!(await isAuthorised(ctx))) {
    redirect(ctx.req, ctx.res, "/login");
    return {};
  }

  return {};
};

const isAuthorised = async ({ req, res }) => {
  const token = nextGetCookie(COOKIE_NAME, { req, res });
  const refreshToken = nextGetCookie(REFRESH_COOKIE_NAME, { req, res });

  if (!token) {
    return null;
  }

  const verifier = createVerifier();
  const payload = await tryParseToken(token, verifier);

  if (payload !== null) return payload;

  if (refreshToken === null) return null;

  const newTokens = await tryRefreshTokens(refreshToken);

  if (newTokens !== null) {
    console.log("Access token refreshed");

    nextSetCookie(COOKIE_NAME, newTokens.access_token, {
      req,
      res,
      path: "/",
      sameSite: "lax",
      httpOnly: true,
    });

    const payload = await tryParseToken(newTokens.access_token, verifier);

    return payload;
  }

  return payload;
};

const tryParseToken = async (token, verifier) => {
  try {
    const payload = await verifier.verify(token);

    return payload;
  } catch {
    return null;
  }
};

const createVerifier = () => {
  return CognitoJwtVerifier.create({
    userPoolId: process.env.NEXT_PUBLIC_USER_POOL_ID,
    tokenUse: "access",
    clientId: process.env.NEXT_PUBLIC_CLIENT_ID,
  });
};

const redirect = (req, res, path) => {
  if (!req) {
    Router.push("/login");
    return {};
  }

  res.writeHead(302, {
    Location: path,
  });
  res.end();
};

const tryRefreshTokens = async (refresh_token) => {
  const refreshUrl = `${process.env.NEXT_PUBLIC_COGNITO_URI}/oauth2/token`;
  const clientId = process.env.NEXT_PUBLIC_CLIENT_ID;
  const redirectUri = process.env.NEXT_PUBLIC_DOMAIN;
  const secret = process.env.CLIENT_SECRET;

  return new Promise(async (resolve) => {
    const res = await fetch(refreshUrl, {
      method: "POST",
      headers: new Headers({
        "content-type": "application/x-www-form-urlencoded",
      }),
      body: Object.entries({
        grant_type: "refresh_token",
        client_id: clientId,
        redirect_uri: redirectUri,
        refresh_token: refresh_token,
        client_secret: secret,
      })
        .map(([k, v]) => `${k}=${v}`)
        .join("&"),
    });

    if (!res.ok) {
      resolve(null);
      return;
    }

    const newTokens = await res.json();

    resolve(newTokens);
  });
};

export default MyApp;
To test that the code is working, log in, wait five minutes, and refresh the page. You should see a log message containing Access token refreshed to indicate that the access token has been refreshed
Revoking the refresh token
As mentioned above, technically you cannot 'log out' when using JWT because there is no session. However, if you set the token lifespan very short, and revoke the refresh token (prevent a new access token from being generated), it will do the job.
Implementing the logout button
Update the file pages/index.js with the following.
import Router from "next/router";

export default function Home() {
  const handleLogout = () => {
    const url = `/api/revoke`;

    var requestOptions = {
      method: "GET",
      headers: [],
      redirect: "follow",
    };

    fetch(url, requestOptions)
      .then((response) => response.text())
      .then(() => {
        Router.push("/login");
      })
      .catch((error) => console.log("error", error));
  };

  return (
    <div>
      <h1>Protected Homepage</h1>

      <div>
        <button onClick={handleLogout}>Logout</button>
      </div>
    </div>
  );
}
The method will make a request to the API route /api/revoke, which we will implement next.
Add API route
Next, create the file pages/api/revoke.js
import { CognitoJwtVerifier } from "aws-jwt-verify";
import {
  getCookie as nextGetCookie,
  setCookie as nextSetCookie,
  deleteCookie as nextDeleteCookie,
} from "cookies-next";

const COOKIE_NAME = "ACCESS_TOKEN";
const REFRESH_COOKIE_NAME = "REFRESH_TOKEN";

export default function handler(req, res) {
  if (req.method !== "GET") return;

  return new Promise((resolve, reject) => {
    const refreshToken = nextGetCookie(REFRESH_COOKIE_NAME, { req, res });

    revokeToken(refreshToken)
      .then(() => {
        // nextDeleteCookie(COOKIE_NAME, {
        //   req,
        //   res,
        //   path: "/",
        //   sameSite: "lax",
        //   httpOnly: true,
        // });

        // nextDeleteCookie(REFRESH_COOKIE_NAME, {
        //   req,
        //   res,
        //   path: "/",
        //   sameSite: "lax",
        //   httpOnly: true,
        // });

        res.status(200).send();
        resolve();
      })
      .catch((error) => {
        res.status(500).end();
        resolve();
      });
  });
}

const revokeToken = (refreshToken) => {
  const clientId = process.env.NEXT_PUBLIC_CLIENT_ID;
  const clientSecret = process.env.CLIENT_SECRET;

  const credentials = `Basic ${Buffer.from(
    clientId + ":" + clientSecret
  ).toString("base64")}`;

  var myHeaders = new Headers();

  myHeaders.append("Authorization", credentials);
  myHeaders.append("Content-Type", "application/x-www-form-urlencoded");

  var urlencoded = new URLSearchParams();
  urlencoded.append("client_id", clientId);
  urlencoded.append("token", refreshToken);

  var requestOptions = {
    method: "POST",
    headers: myHeaders,
    body: urlencoded,
    redirect: "follow",
  };

  return new Promise((resolve, reject) => {
    fetch(
      `${process.env.NEXT_PUBLIC_COGNITO_URI}/oauth2/revoke`,
      requestOptions
    )
      .then((response) => response.text())
      .then(() => {
        resolve();
      })
      .catch((error) => {
        reject(error);
      });
  });
};
The code above gets the refresh token, and then calls the revoke endpoint.
I have commented out the delete cookies part so you can see the token being revoked. Login, click the logout button and then wait 5 minutes. Once the authentication token has expired, you should be logged out, and you won't be able to navigate to the homepage.
Finally, uncomment the code that deletes the cookies. This will ensure that access is revoked locally.
Here is a link to read more about the Cognito Revoke endpoint.
Conclusion
You should now have a practical understanding and a working example of using Cognito to secure a nextJs app.
Your next steps should be to build something yourself and read through the Cognito documentation.